You want your new subscriber to have the very best experience; not doing so puts your brand and their experience at risk.
About a month ago I was setting up a free, three-part email course. And by that I mean that somebody would sign up and then they would get a course delivered to them in three parts over five days via email. As I was setting up the sign-up process, I thought, “You know what? This setup process is something that my clients always say they don’t know about,” which is not good because the process I am about to show you is super important because this has to do with the experience your new subscriber has from the moment they click the sign-up button until they complete the sign-up process.
Customizing the entire sign-up process allows you to set expectations.
If you go through all of the sign-up process and put in custom messaging, you can tell your new subscriber details about what to expect. For instance, you can tell them when they will get emails from you. You can tell them what type of emails they can expect. You can tell them how to get in touch with you if there is a problem with your emails. And you can tell them you are grateful that they signed up for information from you.
The good news is that creating a customized message that is perfect for your new subscribers and your unique voice is fairly quick. Here’s how:
I have made a video for you of how to do the setup for your email marketing list that you can watch below or you can read through all of the steps, which are below the video.
Here are the written steps for you:
Do you have a list?
If you don’t have a list created in your email provider, you will need to set one up to do the rest of the steps. Lists hold the email addresses of your email subscribers. Whether you have a list or not, your first step (in MailChimp) will be to click the List button, shown below.

Next, if you don’t have a list, click the “create list” button.

Or if you do have a list, select the the name of the list you want to work with.

Go to your sign-up forms section.
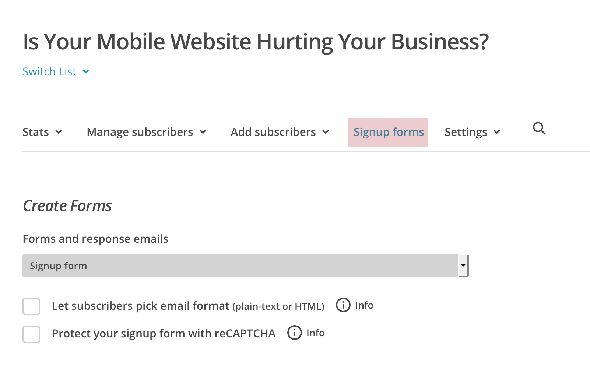
Now that you are in the list, in MailChimp, click the “Signup forms” link
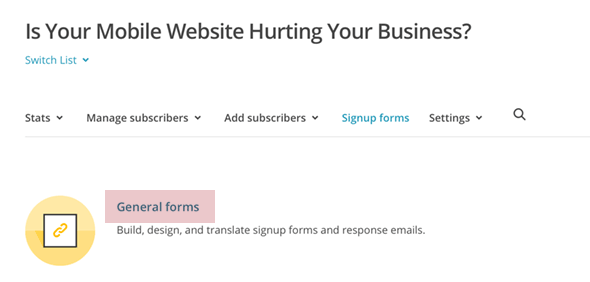
Go to the General Forms.
Most email marketing systems will have many types of ways that you can link to or embed your sign-up form. You want to find where all of the forms and emails are that make up the sign-up process. In MailChimp, this is the General Forms section, which you will find after clicking “Signup forms”.
Edit the Sign-up Form
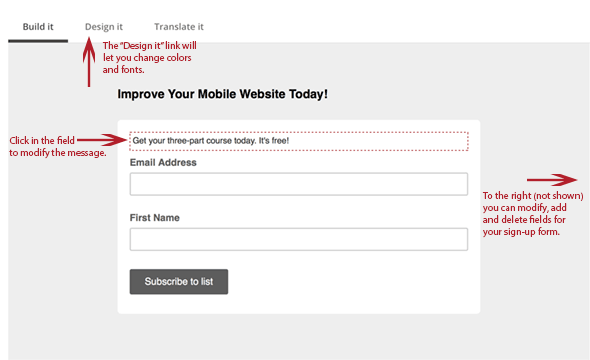
The first form to customize is the actual form the user will fill out to start the sign-up process. This is called the sign-up form. After clicking “general forms,” you should be able to scroll down the screen to see the sign-up form, shown below.
In MailChimp, you can edit the messaging above the sign-up form and the fields you are asking the subscriber to fill out. MailChimp will also let you change the colors and fonts by clicking the “Design it” link, which is above the form.
Signup Form with Alerts
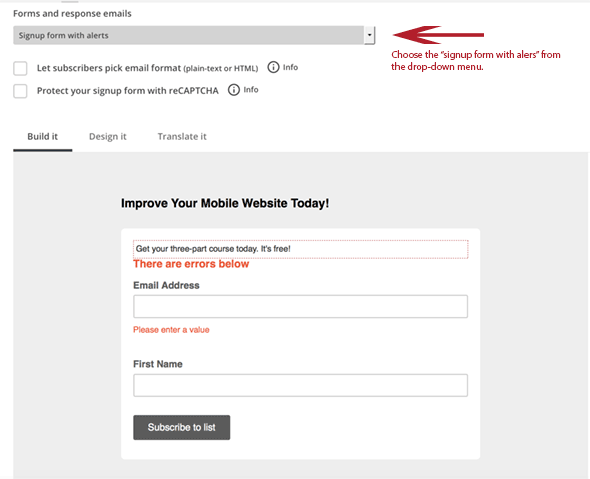
The next option is to check the messages that appear when someone doesn’t fill out your sign-up form correctly. Some providers will let you change the error messages. MailChimp will not, but they will let you adjust the error message coloration through the “Design it” section.
Signup “thank you” page
I cannot emphasize how important your “thank you” page is. This is where you actually say “thank you” and this is also where you tell them what comes next. For instance, in the case of MailChimp, there is a double opt-in process. This means they have to confirm their subscription.
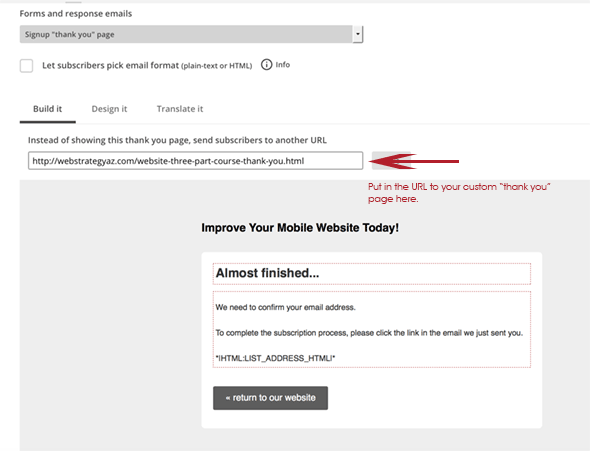
I like to create a custom thank you page that is actually served on my site, not through MailChimp. This page was created through LeadPages.net. One of the reasons I do this is because I want them to be crystal clear about what’s coming next. I want them to complete the sign-up process, so I want to draw attention to the confirmation email that’s coming their way. I also want them to know that they are almost finished with the process and that whatever I promised them is on its way to them as soon as they confirm their email sign up.
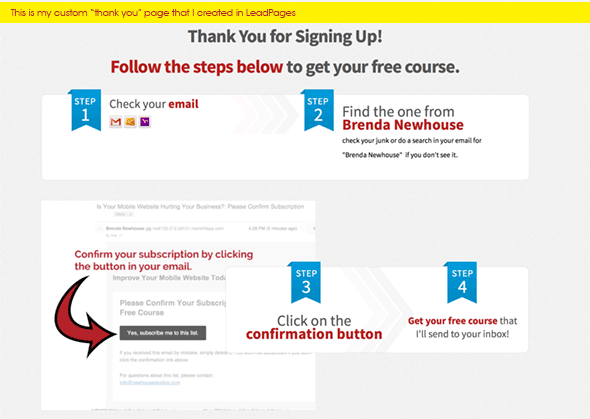
Another reason for creating a custom thank you page is that I get to make it look and feel however I want if I do use a service like LeadPages. So this is a time where I can really connect with them. I could even put a video in the thank you page where they see and/or hear me. I want them to know I take their relationship with me seriously and I will treat their email address with the highest respect.
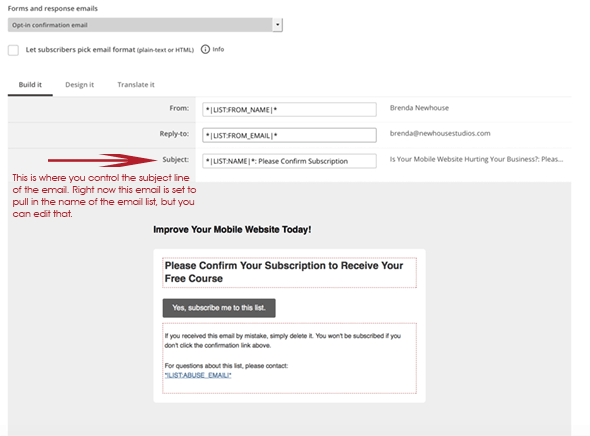
Opt-in confirmation email
In MailChimp, you get the option to control the subject line of this email. You can also control the header within the email and the message below it. Whatever you do, make sure this email mirrors what your “thank you” page just told them would happen. Also be sure to remind them of what they are about to get once they subscribe.
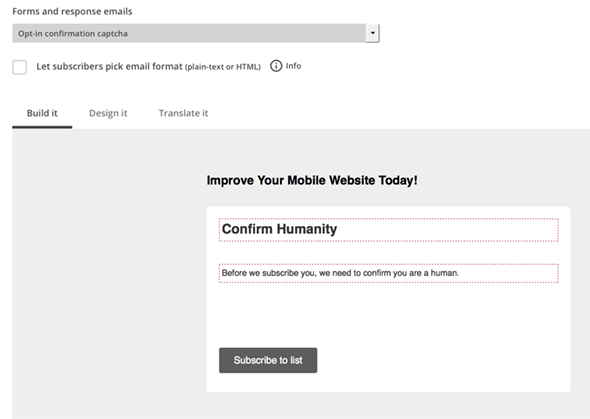
Opt-in confirmation Captcha
MailChimp tries to help by confirming you are getting a human signing up for your list, not a bot. It does this through the captcha page. You can change your messaging in this email to something your audience will appreciate. But keep this page brief if you do change anything as it is only a formality.
Confirmation “thank you” page
This is a super important page.
Your subscriber has made it to the finish line of signing up with you. You need to thank them again. Really, it’s a big deal that they have signed up for your emails.
But here’s the thing that I almost screwed up with my free email course. I almost didn’t tell them what to do if the first part of my course didn’t automatically arrive in their inbox. You need to do this. In the screenshot below I tell the new subscriber:
- When they should get the first part of their course (within 10 minutes)
- What to search for if they don’t see it arrive (Brenda Newhouse)
- Where to check if they don’t see it (Junk folder and Promotions tab)
- What to do if they just can’t find it (email me)
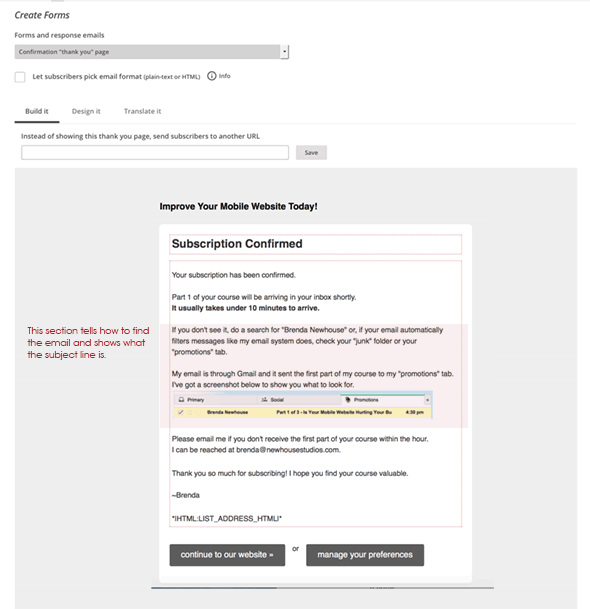
This is caring for your audience. You want them to know you really want to give them the thing you promised. You want them to be aware that even though it should arrive, they might need to search for it. This should communicate that you are genuine and are sensitive to them having a positive experience.
I almost screwed this up. I didn’t realize my email would deliver to anywhere but the inbox (because it always had arrived in the inbox before). How did I avoid a disaster of people not getting my course? I tested the sign-up process and found out where my email was getting delivered. Which brings us to our next section…
Test your sign-up process so you can see the process through the eyes of your new subscriber to guarantee a perfect first experience with you.
Here’s some tips for testing your email sign-up process:
- Sign up at a different account than the one attached to your email marketing service.
- Have someone else go through the sign-up process and watch and listen to their reaction to each step.
- Once you think you have it all exactly right, wait two days, sign up again using a totally different account, and read through the whole process again carefully. You will be surprised at what you find now that your brain has had a break for a couple days.
I hope this is valuable to you and if you have questions about improving your online marketing efforts, leave a comment below. I might turn it into an upcoming training session.
If you liked this article and would like to receive more free training from me, please sign up below. I publish one article a month and then I do a free live webinar once a month featuring easy-to-implement techniques to grow your business online; join me!
Great article! Loved the video and how you focused on every type of letter, I sometimes forget to look through them all. Definitely awesome tips on the final thank you page where you set up the expectations for the course and give the heads up about the email and spam filters, etc. Like you said, some people would get in touch to check why they didn’t get the email and some will not, and you don’t want to lose out on a chance to offer them the info you have.
Hi there, Lilith!
Thank you for your feedback. I am so glad the article was helpful.