This tutorial is part of a series of free Jigsy tutorials. I’m going to walk through not only how to do the essentials to build your own website with the Jigsy website builder, but also, in each tutorial, I will offer advice along the way to help make your website be its strongest for promoting your business while showing you how to build your website in Jigsy as easily as possible. So let’s get started with today’s Jigsy Tutorial, Editing a Menu in Jigsy: Creating a Drop-Down Menu.
This tutorial will teach you:
- How to create a drop-down menu
- Two techniques I use to keep my drop-down menus helpful and easy to understand.
The next tutorial in this series will cover:
- How to link to other websites directly from your menu
- Why linking to other websites is good for your business.
- Why linking to other websites can be bad for your business.
Drop-down menus can get messy and overwhelming quickly. Here are two ways I keep my drop-down menus friendly and simple.
Technique 1:
Present Your Drop-Down Menu Options in a Logical Flow
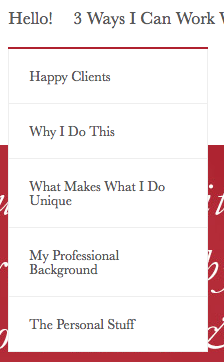
On my website, my first drop-down menu is a “get to know me section.” Each item in the drop down menu is placed in a very specific order. Here’s what it looks like:

When a person sees “Hello!” in the main navigation, it’s easy to gather that I am going to be introducing myself. They shouldn’t expect product offerings or contact information in this section.
Here’s how I think about each option in my “Hello!” drop-down menu:
- Happy Clients
The first thing I want them to see are case studies. “Case Studies” sounds more business-like and less personable, so I went with “happy clients.” I made this my first option because I want you to see what type of people I work with and what type of work I do at a glance. This is a way of letting you know if you are in the right place because at a glance you will know that I work with a lot of small businesses and I work with a lot of women. - Why I Do This
This is letting people get to know me from a business perspective; a lot of what I do is based on the relationships that I have with my clients, so I’d like you to have a look into my philosophy behind my business right away. - What Makes What I Do Unique
If I go to a small business expo, I’m pretty sure I can throw a rock and hit 15 web designers, and I can’t throw very far, so that’s saying something. There’s nothing unique about being a web designer. What is unique is my approach of working live and giving business strategies and live training all at the same time. That’s what you’re really getting when you work with me; oh yeah, and you get me, not a team member of mine. Those are things I want people to know, especially if you are looking for more than just a website. - My Professional Background
Unlike new web designers and web strategists, I have a long professional background. I want people to know it. My ideal client cares about this sort of thing so I want them to find it easily. - The Personal Stuff
I am a human and you’re going to be working directly with me; you might want to know if you can stand my personality before you engage with my services. If someone who loves Broadway and dogs makes you want to jump for joy or run for the hills, I want you to know I am all about those things right away.
Technique 2:
Present as Few Options as Possible
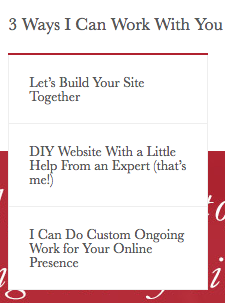
Now, when it comes to the products and services that I offer, I really, really, want you to have as few choices as possible. Seriously. Too many choices make people feel like they need to compare services and that sounds like a hassle to most. Also, if I have too many options, people might get confused; confusion never converts. Lastly, I am about making things easy for people because business is hard enough and everyone needs more time in the day, so my services choices should be easy to understand at a glance. This is why I keep my choices to three. You know there’s three choices before you trigger the drop down because I have entitled my services menu as “3 Ways I Can Work With You.”

When you look at my three options, they are distinct at a glance. We’re either working together to build a site or you’re going to do it yourself and get a booster shot from me or you’re looking to have me help you on an ongoing basis.
Editing a Menu in Jigsy, Step 1
The Page Navigation Editor
To begin editing a menu in your Jigsy website, begin by simply placing your mouse over the menu. An outline should appear.

Next, place your mouse over the gear that appears in the lower-right corner of the outline. When you do a pop-up menu should appear with two options: Edit and Animations. Choose Edit.

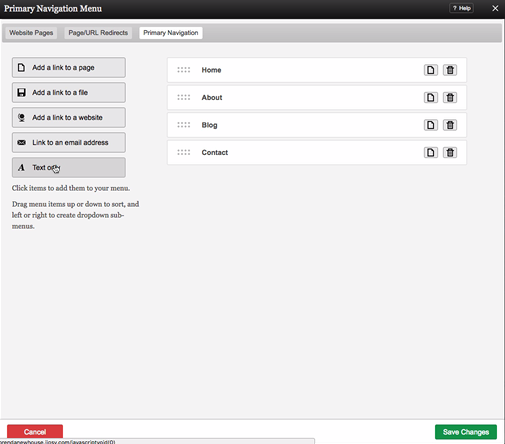
Once you click “edit,” the Primary Navigation menu dialog box will appear.

How to Create a Drop-down Item when Editing a Menu in Jigsy
This is so easy in Jigsy. I love it. Just do these simple steps to create a drop-down menu item:
- Create the page or text item that is going to trigger the drop-down menu.
- Create the page that is going to be a drop-down item.
In my case, “Wendi, Midwife” is the drop-down item and “Happy Clients” is a page that will serve as a trigger for my drop-down menu.

Next, Just click and hold the eight dots to the left of the name of the page that will be a drop-down item and drag it under the drop-down trigger.

Lastly, drag the drop-down item in toward the right, so it looks indented, and then let go.

When you let go of the drop-down item, you’ll know you did things correctly when the item stays indented.

Be sure to click the green Save Changes button in the lower-right corner of the menu editing dialog box to save your new drop-down menu and then you’re all set!
The next Jigsy tutorial in this series will cover:
- How to link to other websites directly from your menu
- Why linking to other websites is good for your business.
- Why linking to other websites can be bad for your business.
Leave a Reply