This is a series of free Jigsy tutorials. I’m going to walk through not only how to do the essentials to build your own website with the Jigsy website builder, but also, in each tutorial, I will offer advice along the way to help make your website be its strongest for promoting your business while showing you how to build your website in Jigsy as easily as possible. So let’s get started with today’s Jigsy Tutorial, Editing a Menu in Jigsy: Adding Pages to Your Menu
This tutorial includes:
- How to add pages to your Jigsy website menu
- How many pages should you have in your navigation bar?
The next tutorials in this series will cover:
- How to create a drop-down menu
- How to link to other websites directly from your menu
How Many Pages Should you Have in Your Navigation Bar?
As few as possible while still providing enough information to guide your user. I talk about strategies to guide your user with your navigation bar in my previous tutorial; you can read it here.
If you look at my website’s main navigation bar, I made it as brief as possible at first glance; there are only six choices.

There are drop-down items from the top six menu choices for some sections, but a person won’t know that at first. I kept my top navigation bar super easy to scan so you can understand what my site is all about easily.
Remember this: confusion stops conversion. So keep that top menu bar (and even the drop-down items) as brief as possible without diluting your website’s mission and your business’ message.
Editing a Menu in Jigsy, Step 1
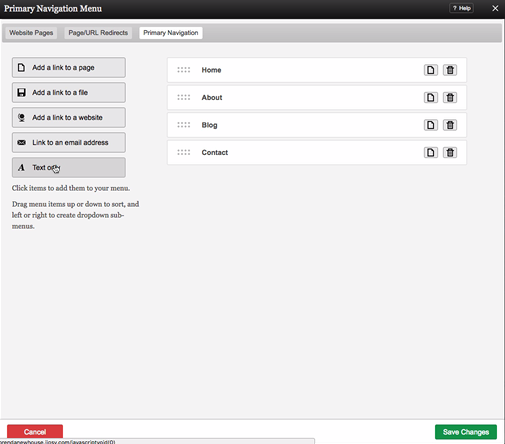
The Page Navigation Editor
To begin editing a menu in your Jigsy website, begin by simply placing your mouse over the menu. An outline should appear.

Next, place your mouse over the gear that appears in the lower-right corner of the outline. When you do a pop-up menu should appear with two options: Edit and Animations. Choose Edit.

Once you click “edit,” the Primary Navigation menu dialog box will appear.

How to Add Pages to Your Jigsy Website Menu
I’d like to continue to build out my menu by adding two more pages and I would like to do it while editing my menu. Jigsy makes this easy. The two pages I’m going to create are:
- Happy Clients
- Wendi, Midwife
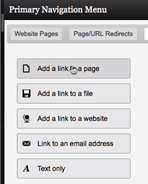
While in the Primary Navigation Menu editor, I just need to click the “Add a Link to a Page” button to start the process.

The next dialog box that appears will ask me two things:
- What do I want to label the page? This is what the visitor to the site will see.
- Select a page. This is where I choose or create the page I want to be connected with the label.

First, type the name of the label in the field on the left-hand side of the dialog box.

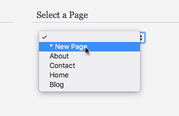
Next, on the right-hand side of the dialog box, you will see “Select a Page.” There’s a drop-down list you can use to choose your page OR to create a page. In our case, we want to create a page, so we will click the drop-down list and select “New Page.”

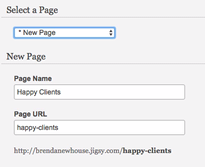
When you select “New Page,” Jigsy will take a guess and fill out the information for you based on the label you created. If you like what Jigsy filled in for you, great; if not, go ahead and change it.

Then click the green “Create” button in the lower-right corner of the screen to accept the new page.
You can repeat this process to create as many pages as you would like.
In my next tutorial, I’ll show you how to create drop-down menus for your Jigsy website and I’ll share how I keep my drop-down menus helpful and easy to understand.
Leave a Reply